You've probably seen buttons like "Login with Google" or "Continue with GitHub" on websites. That's OAuth in action. But what exactly is happening behind the scenes?
OAuth might seem complex, but it's actually quite simple: it lets users sign into your app using accounts they already trust, without ever sharing their passwords with you.
OAuth in One Sentence
OAuth lets users log into your app with Google/GitHub/etc. without giving you their passwords.
What Is OAuth?
OAuth (Open Authorization) is a protocol that lets users authenticate with your application using existing accounts from trusted providers. Instead of creating yet another password, users can leverage accounts they already have and trust.
The key insight: your application never sees the user's actual password. The authentication happens on the provider's secure servers, and you receive a verified token that proves the user's identity.
Why Use OAuth?
- Skip the auth complexity — No password storage, reset flows, or security compliance headaches
- Better user experience — Users sign up in seconds with accounts they already have
- Enhanced security — Let Google and GitHub handle the security; they're better at it than most of us
- Less support burden — Fewer password-related support tickets and account recovery requests
How OAuth Works
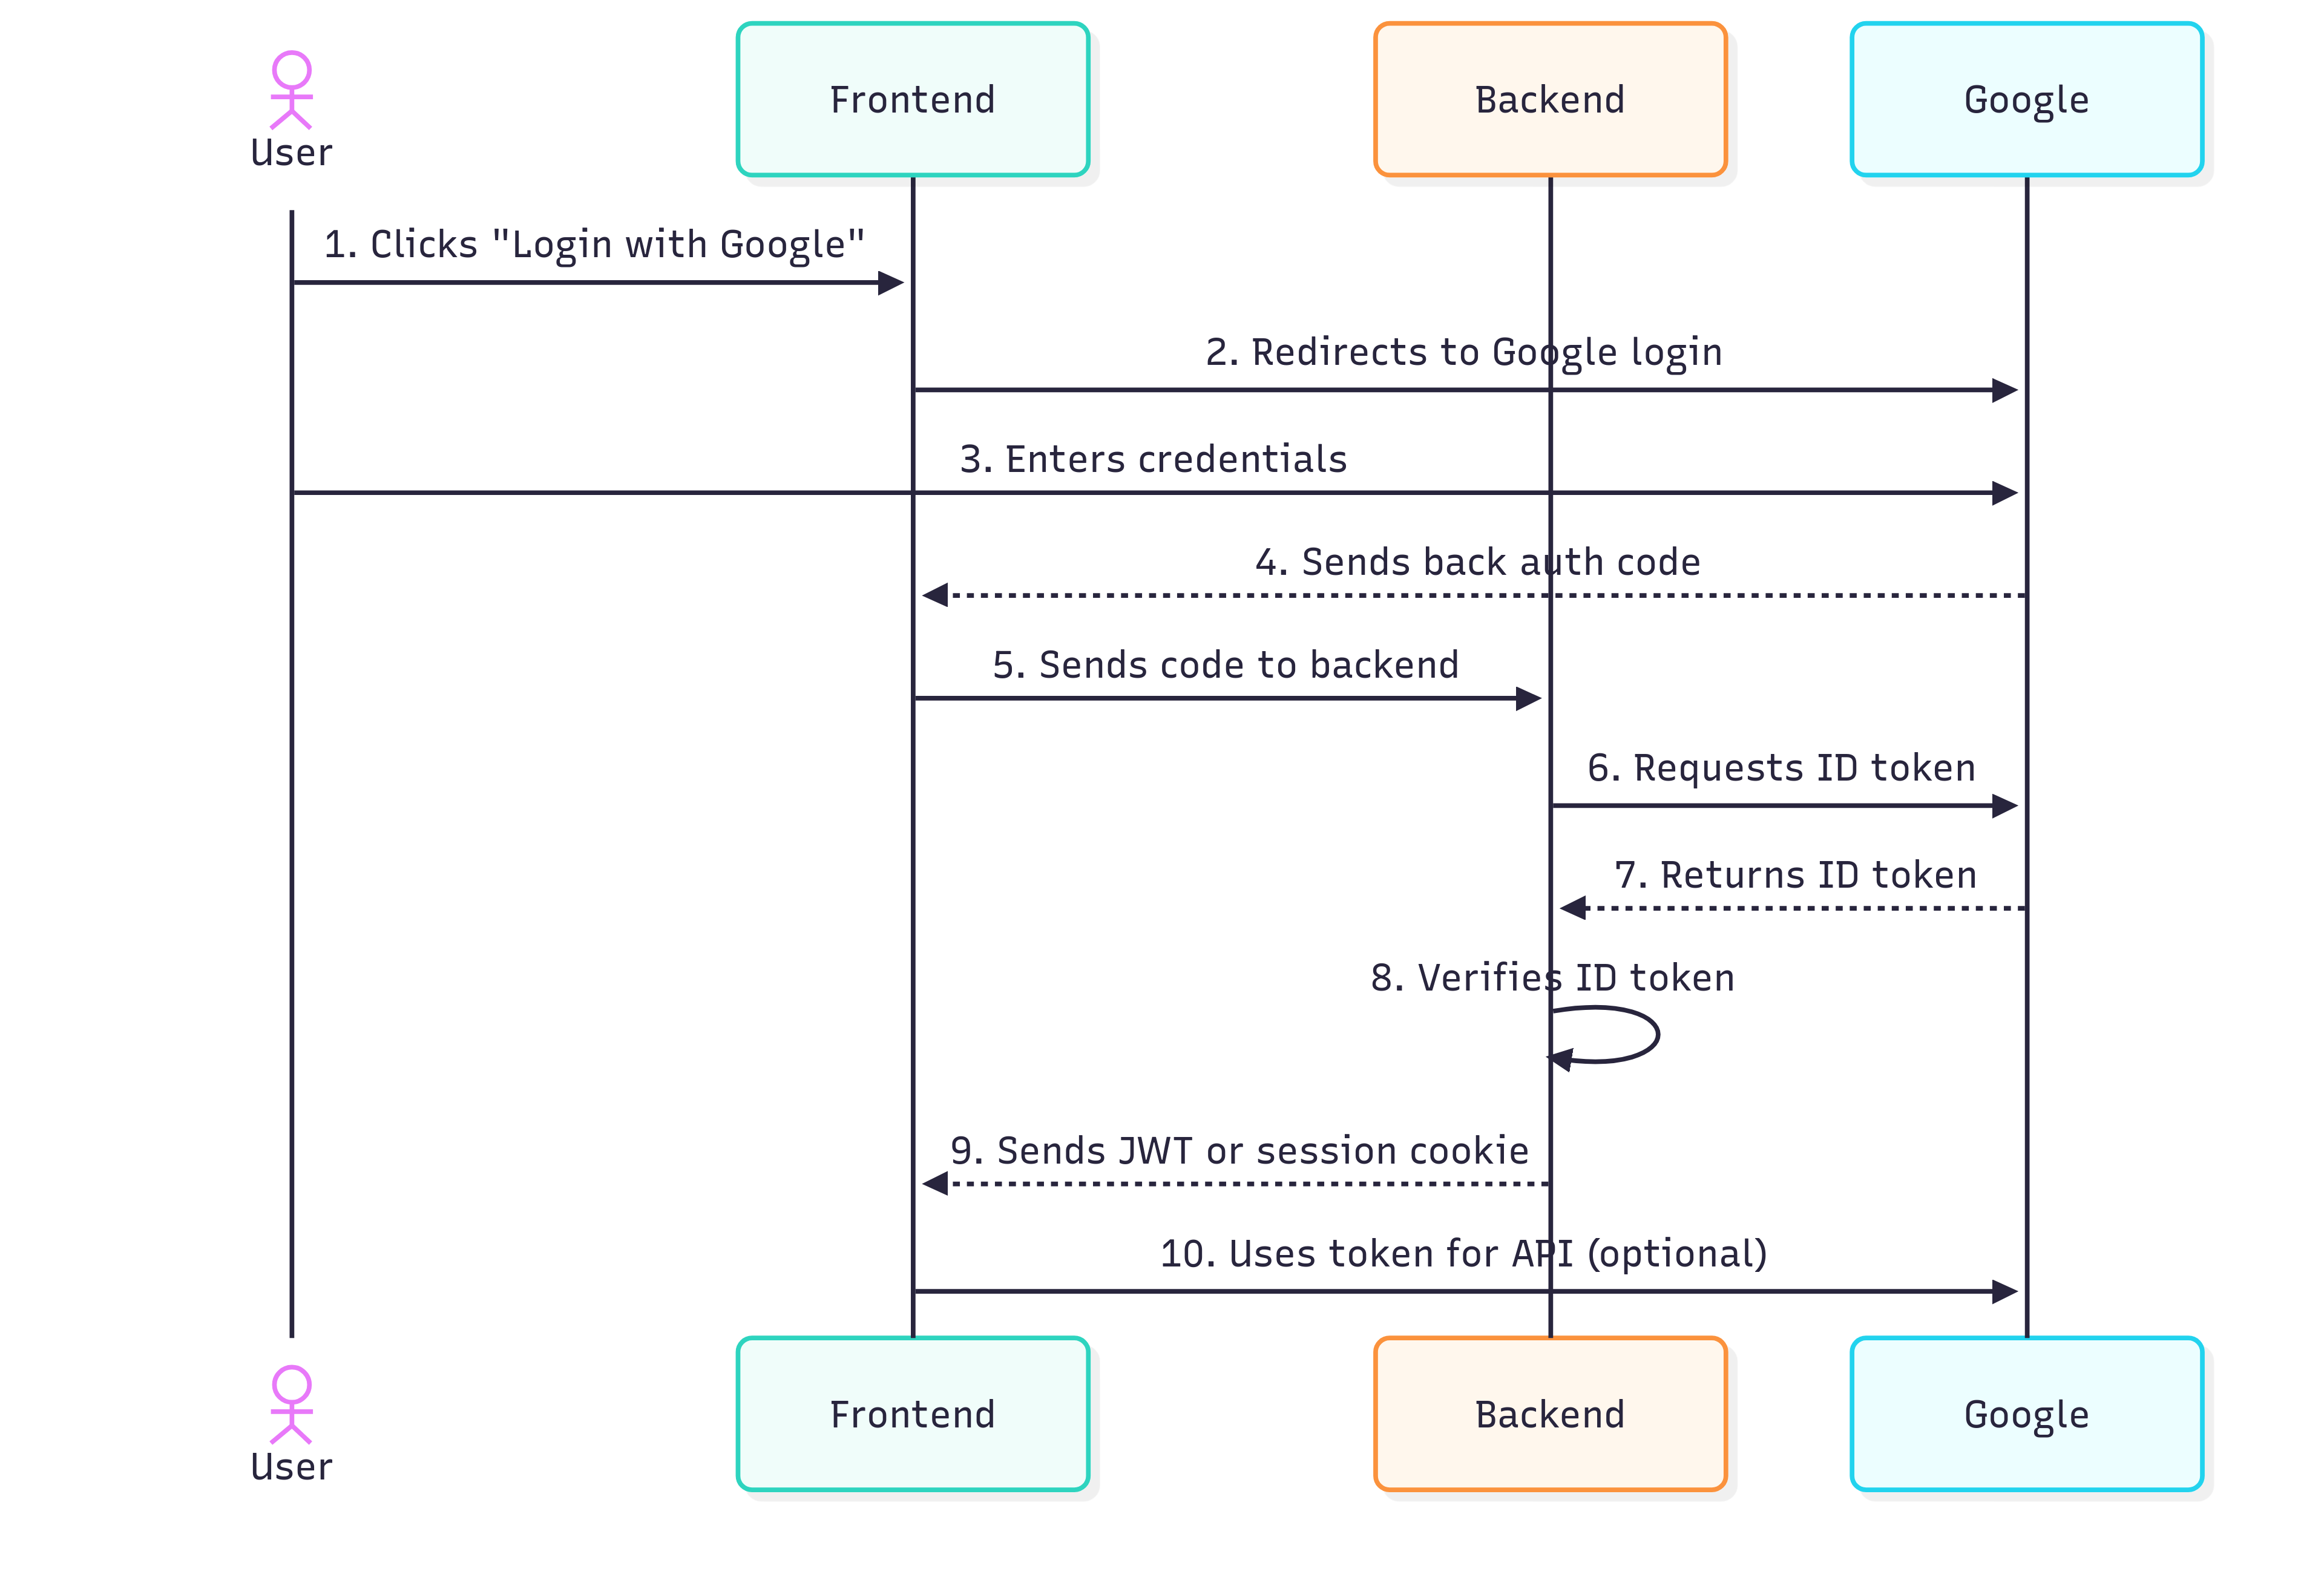
The OAuth process involves three parties: the user, your application, and the OAuth provider. The entire flow is designed so that sensitive credentials never touch your servers.

The complete OAuth flow from start to finish
The Process Step by Step
1. User clicks "Login with Google"
Frontend redirects user to Google's authorization server with app credentials and permission scope.
2. Redirect to Google login
User is sent to Google's secure login page with your app's authorization request.
3. User enters credentials
User logs in with their Google username and password directly on Google's servers.
4. Google sends back auth code
After successful login and consent, Google redirects user back with a temporary authorization code.
5. Frontend sends code to backend
Your frontend passes the authorization code to your backend server for processing.
6. Backend requests ID token
Your server exchanges the auth code for actual tokens using your app's secret credentials.
7. Google returns ID token
Google responds with verified user information in a secure JWT token format.
8. Backend verifies ID token
Your server validates the token signature and extracts verified user information.
9. Send JWT or session cookie
Backend creates a session for the user and sends authentication token to frontend.
10. Use token for API (optional)
Frontend can now make authenticated API calls using the session token.
The Three Token Types
Authorization Code
Temporary voucher that expires in minutes. Gets exchanged for real tokens.
Access Token
Allows API calls to the provider on the user's behalf (e.g., reading their profile).
ID Token
Contains verified user info (email, name) in a cryptographically signed JWT format.
Security Essentials
- Always verify tokens server-side — Never trust tokens that come from the frontend
- Use HTTPS everywhere — OAuth involves sensitive redirects and tokens
- Store tokens securely — Use HTTP-only cookies, not localStorage
- Validate token audience — Make sure tokens are intended for your app
"OAuth isn't just about making login easier—it's about making it more secure by removing passwords from your application entirely."
Key Takeaways
OAuth elegantly solves the password problem by delegating authentication to trusted providers. Users get faster logins with accounts they already trust, while developers get robust security without the complexity.
The most important thing to remember: focus on the user experience. Clear permission requests, obvious login buttons, and graceful error handling make the difference between OAuth that users love and OAuth that users avoid.
// Frontend: Initiate OAuth flow
function loginWithGoogle() {
  const params = new URLSearchParams({
    client_id: 'your-google-client-id',
    redirect_uri: 'https://yourapp.com/auth/callback',
    response_type: 'code',
    scope: 'openid email profile',
    state: generateRandomState() // CSRF protection
  });

  window.location.href = `https://accounts.google.com/oauth/authorize?${params}`;
}

// Backend: Handle the callback
app.get('/auth/callback', async (req, res) => {
  const { code, state } = req.query;

  // Verify state parameter (CSRF protection)
  if (!verifyState(state)) {
    return res.status(400).send('Invalid state');
  }

  try {
    // Exchange code for tokens
    const tokenResponse = await fetch('https://oauth2.googleapis.com/token', {
      method: 'POST',
      headers: { 'Content-Type': 'application/x-www-form-urlencoded' },
      body: new URLSearchParams({
        code,
        client_id: process.env.GOOGLE_CLIENT_ID,
        client_secret: process.env.GOOGLE_CLIENT_SECRET,
        redirect_uri: 'https://yourapp.com/auth/callback',
        grant_type: 'authorization_code'
      })
    });

    const tokens = await tokenResponse.json();

    // Verify and decode ID token
    const userInfo = verifyGoogleIdToken(tokens.id_token);

    // Create user session
    req.session.user = {
      id: userInfo.sub,
      email: userInfo.email,
      name: userInfo.name
    };

    res.redirect('/dashboard');
  } catch (error) {
    res.status(500).send('Authentication failed');
  }
});
💡 Tip: Always validate tokens server-side and use HTTPS in production. Never expose client secrets in frontend code!